Foreword
You'll only get the full potential of your M1 Apple Silicon based mac if you use as many libraries and executables that work native as possible. Fortunatelly, the Apple M1 Version of Homebrew is quite simple to install and many formulars have been compiled already.
Sometimes you'll stumble across something that is not yet precompiled for your apple silicone and the install of it fails. Fortunatelly the developers of Homebrew had along time enabled the multiple use of different homebrew versions by designing the application nicely.
Our goal to seamless integrate the new M1 architecture with our current intel based one is to install 2 homebrew versions: one native apple m1 and one legacy intel version which will be powered by rosetta.
And thats how you should use homebrew after the installation: first you should try to install a formular using the native version of Homebrew. If that fails you can fallback to the intel version. Both should integrate without any problems.
If you encounter any problems or have a missunderstanding, don't hesitate to write it into the comments section below to get some help. And if it worked for you feel free to click one of the reaction emojis below the article.
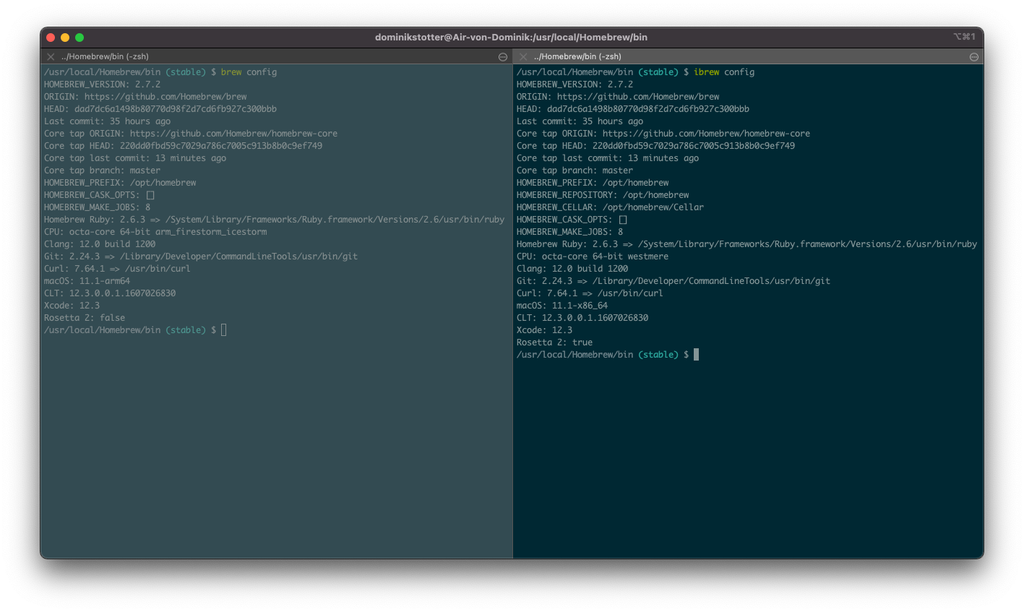
(Left: Apple M1 Native, Right: Intel using Rosetta 2)
1. Install the native Apple M1 version of Homebrew
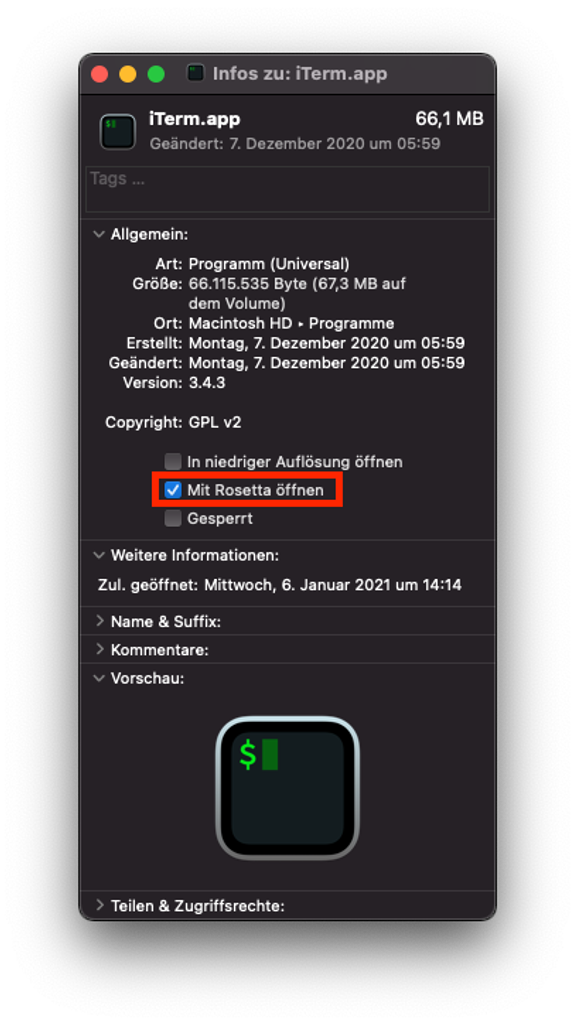
Make sure youre not using the rosetta 2 version of your terminal, to ensure so:
- right click on your terminal application
- make sure "open with rosetta" is disabled

Installation works as described as on the official homebrew website. You can also just run the following script in the non-rosetta terminal.
/bin/bash -c "$(curl -fsSL https://raw.githubusercontent.com/Homebrew/install/HEAD/install.sh)"
2. Install intel version of Homebrew
The intel rosetta version installation is a bit different, you could follow the official alternative installation method. You can also just run the following script in the rosetta terminal.
Make sure youre using the rosetta 2 version of your terminal, to ensure so:
- right click on your terminal application
- make sure "open with rosetta" is enable
cd /opt/local mkdir homebrew && curl -L https://github.com/Homebrew/brew/tarball/master | tar xz --strip 1 -C homebrew
After this step, make sure you reset the terminal rosetta usage. You should disable rosetta 2. Because in the next step we create an alias that automatically calls rosetta with homebrew
3. Add alias for the intel homebrew
At the end you only have to add an alias for your intel based homebrew installation. For example in zsh:
nano ~/.zshrc
You only have to add
alias ibrew='arch -x86_64 /usr/local/Homebrew/bin/brew' alias brew='/opt/homebrew/bin/brew' # optional, it should be default anyway
Usage
as explained in the first part of this guide, you install something using the native version as normal:
brew install xyz
if that fails, you can go back to the intel version of that formular:
ibrew install xyz
